Friday, August 29, 2014

Central Oregon Reboot... Summer Squash Style

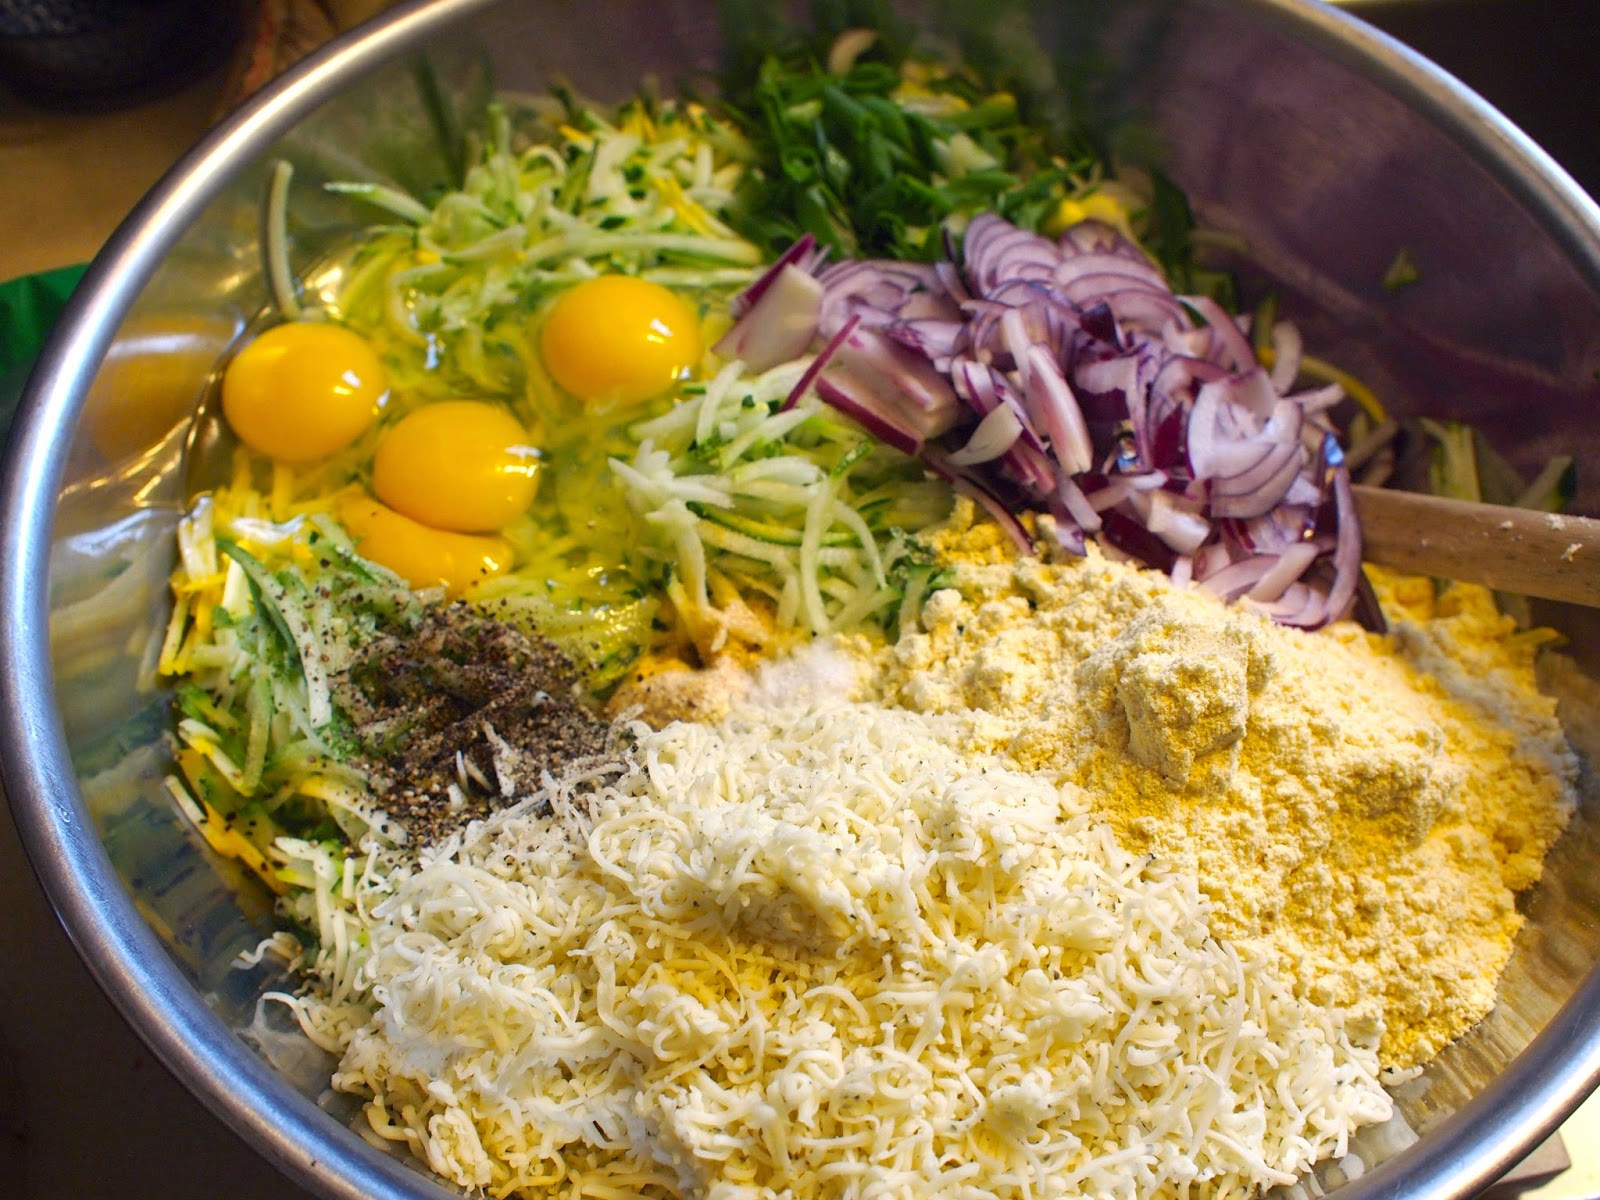
Nevermind that it has been more than three years since I've updated this blog, I had bigger, badder, biking things to do in the interim.  Long story short, I quit my BigLaw job in Washington DC, biked all of Mexico, and now live the good life in Bend, Oregon.  It's the end of August, and while a CSA out east would have long since dispensed of summer squash, they are still thriving at Juniper Jungle Farms and are slowly taking over my kitchen.  In a Herculean effort to get caught up, I decided to make a massive batch of my favorite summer squash recipe... what I call the Summer Squash Sope.

A lot of my cooking is inspired by my 4000 mile bike tour through the backroads of Mexico, including this recipe that I improvised.  A sope is thick masa corn tortilla that is often topped with black beans, meat, and other veggie toppings.  I decided to incorporate as much of my CSA basket as possible into this bastardized version of a sope.

Just four of the gajillion sopes I made...

The recipe is pretty simple, just mix together the following ingredients, the proportions aren't exact and the recipe is forgiving:
  • 1 massive zucchini, 1 medium sized ronde de nice, and 1 yellow summer squash, all shredded with extra moisture squeezed out (CSA basket ingredient)
  • 1 bunch green onions thinly sliced diagonally (CSA basket ingredient)
  • 1/2 medium red onion thinly sliced
  • 4 large eggs
  • 5 large handfuls of masa (I like the "masa amarillo," available locally at Colima market), plus more if squash releases extra liquid over time... it's okay if the mixture is quite moist because the egg and cheese bind the mixture together, it just shouldn't have any liquid floating on top
  • 8 oz shredded cheese that melts and browns well (hard cheeses like parmesan are good, I used a pesto monterrey jack)
  • 1 tbsp garlic powder (or to taste)
  • 2 tsp salt (or to taste)
  • 2 tsp ground pepper (or to taste)
With batches this big, it's hard to estimate how much masa to use... I ended up having to add about two more handfuls!

Over medium heat in a lightly greased cast iron skillet, drop racket ball sized blobs of the mixture and smoosh a bit with your fingers so it looks like a fat pancake.  For those not in the know, racket ball sized blobs is probably equivalent to an eight year old's fist.  Maybe.  After a few minutes, flip and press out with a spatula.  Top with sour cream, a sunny side up egg, yummy leftover cuban ropa vieja (okay, okay, okay, maybe I'm the only one who has yummy leftover venison ropa vieja in my freezer), or just eat with your fingers.  These also freeze really well, but make sure to separate pancakes with wax paper, parchment paper, or brown paper.

The first sope is always ugly and became dinner with some leftover elk cuban ropa vieja on top!

And not that anyone ever has problems using super awesome green beans from the CSA basket, but I like to do a spicy Asian ginger-soy-sesame refrigerator pickle with mine.  Pack a mason jar with cleaned cut green beans, and pour boiling pickling brine over them, let cool, then refrigerate for several days before eating them.  I like to just eat them out of the jar. 

For the pickling brine:
  • 1 cup white vinegar + 1/2 cup water + 1 tbsp sugar OR 1 cup rice wine vinegar + 1/2 cup water
  • 2 tbsp soy sauce
  • 1 tsp whole black peppercorns
  • 4-5 whole crushed garlic cloves
  • 1 inch piece of fresh ginger peeled and slivered
  • dried red pepper to taste
  • 1 tsp sesame oil
  • optional: wasabi paste


Wednesday, March 16, 2011

Takorean Clones

The craze of korean tacos swept from Las Angeles with the Kogi truck (http://kogibbq.com/category/menu/) to Washington D.C. with the Takorean truck (http://takorean.com/menu/).  So, at my latest foodie party which just happened to be a Korean food throwdown, I decided to try to replicate these bad boys.  Takorean's philosophy is simple, (1) choose from bulgogi, carmelized tofu or tangy chicken, (2) choose from a napa cabbage slaw or a spicy kimchi slaw, and (3) then choose from an assortment of toppings, including lime crema, black sesame seeds, cilantro, and siracha.  I decided not to do the classic bulgogi taco and opted instead to attempt my favorite Takorean truck taco... the Carmelized Tofu Taco


Wednesday, March 2, 2011

Cup-Pakes Make Good Bribes

My friend Phil is the pake-master.  By this, I mean, he introduced to me the entire concept of a pake, a pie baked into a cake.  A pake is basically pared down cherpumple, which originally a three-layer cake with an entire pie baked into each layer—a cherry pie baked inside a white cake, a pumpkin pie baked inside a yellow cake and an apple pie baked inside a spice cake.  Phil's pake prowess became so famous that he now cannot be invited to any food party without the expectation of pake (in fact, at the infamous roasted pig head birthday party, we even deep fried the pake).  The leftover pake was stuck in the freezer and slowly enjoyed by me and the man friend... who has since become similarly obsessed with pake.

And so, when man friend decided to upgrade his stationary bike trainer, I proffered pake as a bribe so I, too, could start my long road to cycling geekdom.  Or rather, he told me his bribe of choice was pake.  But I was thwarted by the limitations of my current baking pans.  I had a large pie pan but no cake pan.  What to do?  I eyed my mini-muffin tin and regular muffin tins with interest, recalling a link my friend had sent me of a a mini-pie baked into a cupcake.  The large bags of purple raspberries I had picked last summer were just waiting for a purpose.

And... so.... drumroll please... best... idea... ever... the Purple Raspberry Dark Chocolate Cup-Pake with Raspberry Buttercream Frosting was born. 


I spent an inordinate amount of time researching recipes, and then ended up throwing all caution to the wind and modifying them based on what I had on hand at the time, and barely measuring anything.  For the crust, I decided specifically not to use the perfect flaky buttery crust recipe I had discovered before because its (a) time consuming, and (b) time consuming.  So decided to cut together the following:
  • handful of powdered pecans (basically, throw 'em in the blender and pulverize into dust)
  • 1 1/2 cups whole wheat flour
  • 1/2 cup all purpose flour
  • 1 stick of chilled regular butter
  • some half-and-half and a couple splashes of cold seltzer water (mostly because that was what I was drinking at the time)
  • 1 tablespoon brown sugar
  • a dash of cinnamon
Then I just took small handfuls and pressed them into the mini-muffin tin to line each side.  I saved aside some of the dough to roll out between wax paper and cut circles (my tablespoon measuring spoon turned out to be just the right size).  Pre-bake for about 5 minutes in an oven set to 400F.   Oh, and for the record, don't use seltzer water, it makes the crust rise.  I ended up having to mash the crust back down but overall, it has a pleasant nutty flavor and the texture was good enough that I could pop the pies out of the mini-muffin tins at the end.

The filling was super easy and its delicousness will depend on the quality of the berries you are using.  Luckily, my penchant for delicious raspberries means I go raspberry picking several times when they are in season at a local farm.  And so I took a package of beautiful frozen purple raspberries (approximately 2 cups), drained off about 1 tablespoon of the dark rich juices to add to the frosting, and then mixed it with 1/2 cup of brown sugar and 2 tablespoons of pulverized tapioca pearls and two tablespoons of corn starch.  That's it.  Easy.  Delicious.  Easy.  Did I say it was easy?  I baked the pies at 400F for about 10 minutes and then reduced the temperature to 350F for about 20 minutes.  I feel like I could have pulled the pies out earlier, but I was concerned that the filling wouldn't set.  All in all, they look and taste pretty good, I let them cool in the pan for 5 minutes and then popped 'em out to cool on a rack. 


I decided that I wanted to do the cupcake batter from scratch and have a dense dark chocolate blanket for my muffins.  I think the combination of dark chocolate... not too sweet... with a sweet buttercream frosting is the best.  Everything is about balance.  The recipe was easy enough and I mixed together all the dry ingredients first and then slowly added the wet ingredients:
  • 1 1/4 cups flour
  • 3/4 cup unsweetened cocoa powder (I used Giardhelli)
  • 1 1/2 teaspoons baking powder
  • 1/2 cup regular butter, softened
  • 1/2 cup canola oil
  • 1 1/2 cups sugar in the raw
  • 2 eggs
  • 1/4 cup half-and-half
  • 1/2 cup seltzer water
  • 1 teaspoon vanilla extract
This recipe ended up yielding a thicker batter than I expected, but it worked out beautifully.  I lined the muffin tins with cupcake wrappers, and then filled each one about 2/3 full.  Then I pressed each mini-pie into the tin which made the batter fill up the sides and start to come up over the pie.  I used a knife to fold that overflow over the top of the pie and added dabs of the batter if needed.  The best part about having a thicker batter is that it allows you to shape the cupcake over the pie... you don't have to worry about it rising too much during cooking because there is relatively less muffin to cook than a regular muffin.  If that makes sense.  

Anyway, pop these bad boys in the oven for about 12 or 13 minutes at 375F.  Let cool just long enough that you can pop them out without burning your hands.  Of course, I had to test one to make sure there was proper cup-pake action going on.  Besides, I had made these the night before the man friend was due to come over for dinner so that they would have time to cool all the way before frosting (need at least an hour so the frosting doesn't melt all over the place).


 And finally, it was time to do the frosting.  I decided to get a little fancy, and creamed together the following:
  • 1/2 cup unsalted butter, softened
  • 3 cups powdered sugar (about an entire box)
  • 2 tablespoons milk
  • 1 tablespoon half-and-half
  • 2 tablespoons raspberry juice
Then I shaved some dark chocolate I had picked up on my last business trip to Paris with a microplane on top.  Seriously, dude.


Given the richness of both the pie and the dense cupcake, and the creaminess of the buttercream frosting, vanilla bean ice cream served as the perfect complement.

Thursday, February 24, 2011

Pork, the Other White Meat

I have a profound love of homecured bacon, homecured sausages, roasted pig head, and pork spareribs... it might be a borderline unhealthy love of pork products.  Just because I ordered a bacon omelet with double bacon and bacon on the side does not mean that I have a problem.  Right.  Anyway, I realized the other day that while I love pork, I rarely actually make it at home, reserving it for special occasions or trips to a BBQ shack in West Virginia or Kentucky.  So I decided I would try to make a healthier dinner using pork as the centerpiece the other night and used my Special Man Friend as a guinea pig.  The verdict was that the Chipotle Crusted Pork Tenderloin served with baked sweet potato fries and Broccoli Slaw was a hit.  Learning from the Cuban feast overindulgence, we sadly only took seconds of the broccoli slaw (and compensated for it by eating a couple newly delivered Girl Scout cookies). 

Pork tenderloin, when cooked properly, is an amazingly tender and juicy cut of meat, and relatively lean.  My favorite way to cook meat to use a covered cast iron skillet with high heat with a blackening season of some sort.  It guarantees a wonderful crust and a little mini oven of joy to get the inside perfectly cooked.  Pork tenderloin is no exception.  I decided to depart from my traditional blackening seasoning (equal parts powdered onion, powdered garlic, cayenne, paprika, white pepper, black pepper, and seasoned salt), and went for a spicy-sweet seasoning to create the Chiptole Crusted Pork Tenderloin.  Simply combine:
  • 2 teaspoons garlic powder
  • 2 tablespoons chipotle chile powder
  • 1 1/2 teaspoons fine sea salt
  • 3 tablespoons loosely packed brown sugar
Then cover a small pork tenderloin (mine was about 3/4 of a pound) with the mixture and dump it into a ziploc bag with the extra seasoning.  I let it sit in the fridge for about an hour, and then took the tenderloin out about an hour before I wanted to start cooking to let it come to room temperature for more even cooking.  Heat a cast iron skillet with a lid over medium high heat, make sure your stove fan is on and windows are open, and then put the tenderloin in and quickly cover.  About every 2-3 minutes, turn the tenderloin so that all sides get charred.  Check the internal temperature to make sure it reaches 155 F before letting the meat rest.  If the outside is charred to your liking but the internal temperature is not ideal, finish off a 350 F oven.  Let the tenderloin rest for at least 10 minutes and then slice in 1/4-1/2 inch slices.
I have to admit that I sort of cheated on the Broccoli Slaw.  I wanted something veggie laden that I could make ahead and didn't feel like checking what ingredients I had when I was at Whole Paycheck.  So I bought the Bolthouse Farms yogurt based coleslaw dressing to toss with my baby broccoli (1 small bunch, florets only), shredded carrot (1 carrot), thinly sliced purple cabbage (2-3 cups), sweet onion (1/4 medium onion), dried cranberries (1 handfull), and shredded granny smith apple (1 apple).  The Bolthouse Farms coleslaw dressing is a creamy semi sweet dressing, so I added some tang with a dollap of Miracle Whip and about 2 tablespoons of apple cider vinegar.  Once I had tossed everything together, I stuck it in the fridge for about 2 hours before it was served and it was the perfect complement.

Triathlon Training Recovery Leads to Overindulgance in Cuban Feast

So once upon a time, I put together a bucket list of sorts, involving adventures such as skydiving and exotic travel, and feats of endurance and strength, such as triathlons and marathons.  I've been more than successful at the fun adventures, but not so much with the feats of endurance and strength.  And so, bolstered by the success of running two 10ks and a half marathon, 2011 became the year of running, biking, swimming, and generally being out of breath while I train for a half marathon, two olympic triathlons and a marathon.  My special man friend is also similarly nuts and has been into road cycle racing for the last several years.  This all requires lots of delicious but well balanced calories... my favorite part about burning 500-1000 calories a day training.  Of course, after one particularly grueling day, we probably negated the effects of training by eating some ridiculous amounts of Cuban food -- Venison Ropa Vieja served over white rice, black beans stewed in sofrito, pan-fried plantains, and Sauteed Vegetetables in Mojo Marinade.  In our defense, it was amazingly delicious.

Venison Ropa Vieja was born out of a desire to use my crockpot and to use the venison stew meat I got by bartering homebrews to my "living off the earth" second parents.  Sure, beef is the traditional meat, but local venison hand butchered by people I trust sure as heck beats cows raised in their own poo and processed in a huge facility.  I browned about 2 pounds of venison stew meat in canola oil and then transferred this to my crockpot before I went to work.  Then I threw in the following and set my crockpot to low for 10 hours:
  • 1 small onion, sliced
  • 1 green bell pepper, seeded and sliced into strips
  • 5 cloves garlic, minced
  • 2 cups of pureed tomato (when I get a surplus of tomatos in the summer from my CSA or a mysterious bag dropped off by a friend when their tomato plants overproduce, I pop 'em in a blender and freeze them to use in place of tomato sauce in recipes)
  • 1 (6 ounce) can tomato paste
  • 1 teaspoon garlic powder
  • 2 teaspoons ground cumin
  • 2 tablespoons chopped fresh cilantro
  • 1 tablespoon olive oil
  • 1/2 packet Goya sazon with achiote and culantro
  • 2 tablespoons white vinegar
  • salt and pepper to taste
About 5 minutes prior to serving, use two forks to shred the stew meat and stir well so all the pieces soak up the sauce. 

I love my freezer.  Mostly because it allows me to keep the bounty of summer and fall and maintain the bright freshness of those flavors that often gets lost when dehydrating food or canning it.  Wonderful but delicate herbs like cilantro are often thrown away because it is nearly impossible to use the huge bunch you get before it goes bad.  So I often make Sofrito to stash away in my freezer (if you freeze it in ice cube trays and then transfer to a ziplock, its easy to grab a few every time you need some) for amazing stewed black beans done Caribbean style.  Caribbean style sofrito is basically done by blending together tomato, cilantro, onion, some sort of pepper (I've used everything from green pepper to anaheim to jalapenos and habaneros).  Take about a cup of it for a can of black beans, saute it lightly in canola oil, add a dash of white vinegar and 1/2 a packet of Goya sazon with achiote and culantro, and you'll have the best black beans ever.

With the hearty dense flavors of the black beans and ropa vieja, I wanted something light to accompany the meal.  Cuban food tends to be very heavy, often fried, and usually laden with sweet sweet carbs (rice, plantains, yuca, you name it).  I was researching Cuban vegetable recipes and, no big surprise, there were almost none.  Mostly fresh salsas used for garnish.  I did, however, come across a traditional Cuban grilling marinade usually used to marinate meat and fish.  The flavors incorporated a very bright citrus accent, and I decided I would buck tradition and do Sauteed Vegetables in Mojo Marinade

I basically just sliced a bunch of different kinds of bell peppers, red onion, summer squash, and tomatillos and just barely sauteed them over high heat.  At the last minute, pour the mojo marinade over the veggies and cover to steam for a couple minutes (not too long, still want the veggies to be crisp).  The marinade was simple and could easily be made ahead, just put the following ingredients in the blender and pulse until its all incorporated and as smooth as you can get it:
  • 6 cloves garlic, coarsely chopped
  • 1/2 cup minced yellow onion
  • 1 cup freshly squeezed orange juice
  • 1/2 cup freshly squeezed lime juice
  • 1/2 teaspoon ground cumin
  • 1 tablespoon fresh oregano (dried if you don't have fresh, I happened to have some leftover in my fridge)
  • Juice of 1 lemon
  • 1/2 teaspoon freshly ground black pepper
  • 1 teaspoon kosher salt
  • 1/4 cup chopped cilantro
  • 1/2 cup olive oil
We basically ate until our stomachs hurt, but it was worth it.  Lesson learned... next time stick the leftovers in the freezer first and then dig in. 

Monday, December 6, 2010

When Life Gives You A Pig Head, Roast It!

I went to the Capital Bacon and Beer Bash, and lo and behold, one of the features of the event was a pig butchering demonstration by Chris of SausageCraft, a wholesale small batch craft sausage company.  I had never heard of the company before so I stalked their website before the bash.  You see, craft sausage has been on my food project list ever since I had the life-changing venison brats from Momma Keeler and ever since my mom bought me a book on how to make sausage for my birthday.  But I digress.  Much to my chagrin, they do not sell retail and as far as I can tell, their clients are mostly in Richmond.  Sausage fail.

Anyway, as we all attempted to digest the 10,000 calories worth of bacon and bacon products, the butchering demonstration began.  I like butchering.  It's something I'd like to do more but don't really have the opportunity to do.  I've had the basic venison butchering tutorial.  Much to our joy, Chris explained each cut and then started handing them out to the various spectators.  I'm pretty ruthless when it comes to food.  Life is too damn short to stand back and be a wallflower. 

Clearly, I needed to work out some strategery.  First, a bacon and beer bash generally attracts testosterone-laden and slightly overweight men.  Being a little asian woman probably didn't hurt.  Second, apparantly, people in DC are pretty boring.  They just stare and watch demonstrations.  I believe in interactive demonstrations and banter with the presenter... especially when its a pig butchering.  Come on folks, take the fork out of your um... yea, and have a little fun!  Third, a clear and vocal appreciation of meat will get you everywhere.  Fourth, be helpful.  Really.  Logistically, bagging up ice and putting each cut in a plastic bag kind of sucks, so I decided to pitch in to help expedite the process.  So for all you jerks who just stood there and watched these guys run there butts off for you so you could get your piece of meat, this is why you didn't get the head.  Being nice never hurt anyone and so when I asked for the head (and I also somehow managed to get a rack of ribs too... ), it was mine, no questions asked, much to the chagrin of the trio of guys behind me (who, I might add, basically stalked me to the car).  I wasn't a jerk about it, one woman asked if she could have the ears and I also gave up one of the cheeks, which for me was the coveted part of the pig head.


When I got home, I stuck the head in the freezer and got to researching.  I had a little time as I was planning on using the pig head as my centerpiece for my birthday party.  Most of the options seemed well, not shocking enough.  Head cheese, souse, blah blah blah.  Until I came across a Filipino recipe for crispy pig head.  I decided to modify that recipe and then making different dipping sauces for the meat and the crispy skin.

First, I took the liquid I had braised the pork spare ribs in which was basically water, soy sauce, onion, garlic powder, salt and a crapload of whole peppercorns and brought it up to a boil in a 6 gallon pot.  Yes, I own a 6 gallon pot.  It's pretty handy for brewing beer, canning, and scalding a pig head.  Anyway, after playing around with the head for about thirty minutes (seriously, making a pig head talk is the best kitchen prep ever) and making sure all the hairs were shaved down with a bic razor (yes, I took the moisturizing strip off), I dropped it into the boiling broth and turned the heat off.  I let it sit for about 45 minutes. 


I ladled out the broth and stuck it into quart canning jars to give to friends as party favors.  A wierd party favor but I think this broth would make some epic Korean style ramen.  Plus it made it easier to take the head out.  Then I patted him dry and brushed on a glaze of equal parts water to honey, with a squeeze of lemon, garlic powder, salt and pepper.  Bake at 315 degrees for 4 hours and....


I let it rest for about an hour and then set it out with a spicy horseradish honey mustard sauce, barbecue sauce, bacon ketchup, and hot sauce.  We picked away at the crispy skin which tasted amazing, and dug into the cheek meat.  And so that's what I did when life gave me a free pig head. 

Tuesday, October 26, 2010

Using Leftover Phyllo Dough

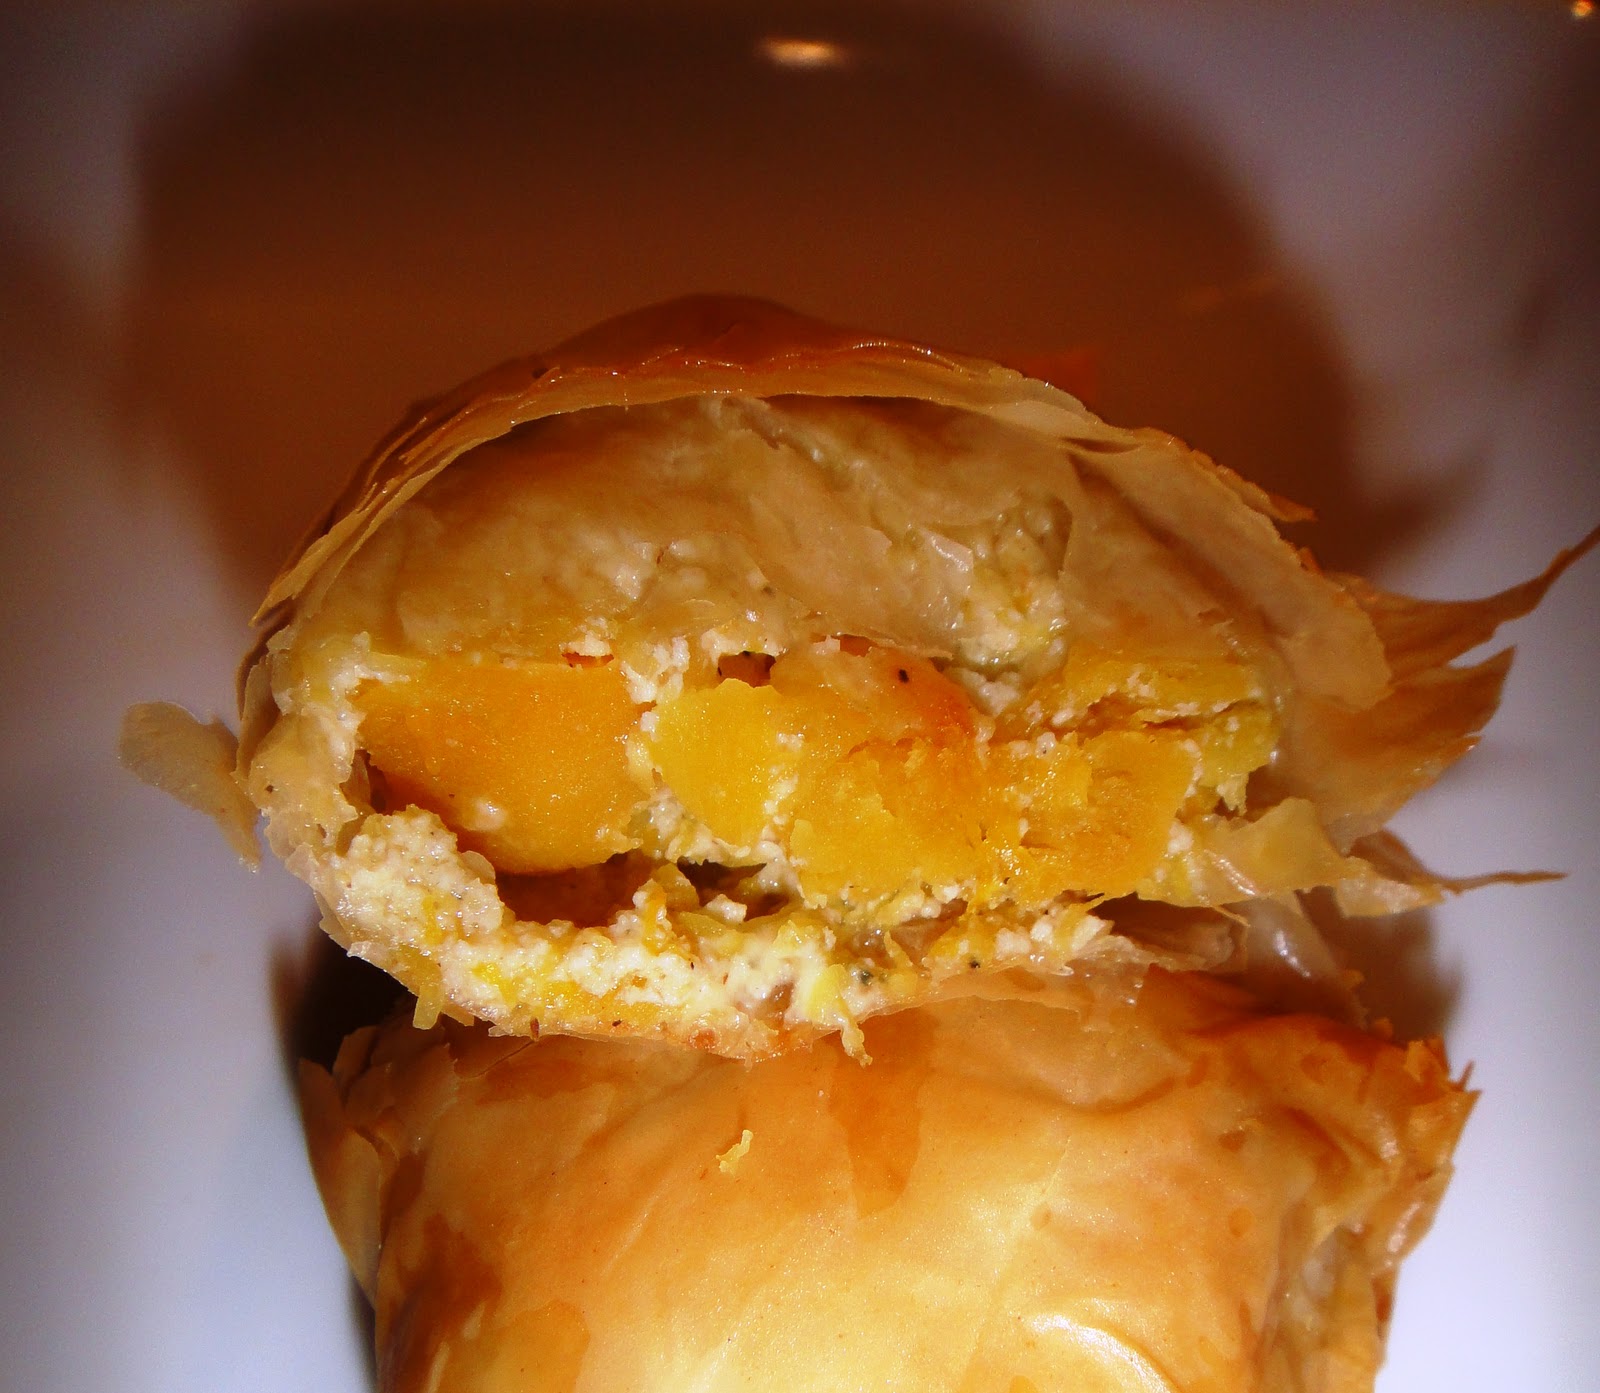
I used to be scared of phyllo dough.  Until last weekend when a friend of mine made spanikopita for a party and I decided to try to make spanikopita myself.  I would have probably blogged that recipe, too, if it hadn't been for the fact that (a) I took no pictures and (b) I've decided since then I prefer the handy cute pastry triangles in lieu of the big casserole.  The wonderful thing about making savory pastries is that you can really throw in whatever leftovers you've got and make something pretty tasty.  Blue Cheese Butternut Squash Pastries are deceptively fancy and tasty.... just the thing for a party to make people think you spent hours and hours in the kitchen, when, in fact, it took about 15 minutes of prep time and 30 minutes in the oven.


So when I peaked into my fridge and saw half a tub of ricotta cheese, some leftover blue cheese, and some butternut squash, my first thought was a nice butternut squash ravioli... except made with phyllo dough!  I roasted the butternut squash, and then mixed some minced garlic in with everything else for the filling.  Take one sheet of the phyllo dough and ... drum roll please ... use a pressurized oil sprayer or spray olive oil instead of brushing butter on.  This lets you get the finest mist of something lovely and fatty to make the phyllo dough cook into flaky goodness.  I sprayed just the right half of the phyllo dough sheet, then folded it in half.  Put some filling in the bottom then "roll" it up into triangles, folding the bottom edge to the side.  Place seam side down on a baking pan lined with parchment paper and bake for about 30 minutes until golden brown.

Monday, August 16, 2010

Sneak Attack Tomatos

A good friend of mine has a garden plot which is producing tomatos like crazy right now.  I've never viewed an abundance of tomatos as a problem, as they can be dried, canned, and otherwise turned into deliciousness with very little work.  Except when a paper bag full of random tomatos mysteriously shows up on your doorstep about 5 hours before you are leaving for a long "meteor shower watching, camping, whitewater rafting, and ziplining" weekend.  And so I threw the paper bag into the fridge, crossed my fingers, and hoped that maybe some would make over the long weekend.  I thank him that at least it wasn't zucchini.


Upon my return, I had a bunch of really really ripe tomatos, and one mushy sad dead tomato.  What else do you make with a ton of tomatos that are about to go bad?  Marinara Sauce.  There is nothing better than a basic pasta sauce with fresh heirloom tomatos.  This is a sauce where the quality of the tomatos is what makes or breaks the flavor.  If done properly, it needs needs nothing except a sprinkling of shaved parmesan and pasta al dente.  I decided to go for a deep sweet flavor which finishes with a spicy kick.

I used about 2 TBSP light olive oil which is better for high heat to sautee one large Spanish onion diced along with about 1 TBSP dried basil, 1 TBSP dried oregano, 1 TBSP garlic powder and 2 tsp red pepper flakes.  I let the whole thing go at medium heat until the onions were carmelized and brown.  Then I threw in all the tomatos, diced, skins and all (mostly because I don't mind the chunks) and added salt and pepper to taste.  I let everything simmer for about an hour, using a potato masher to stir and squish all the tomato-ey goodness.  About 20 minutes before it was done and thickened up, I added about 1 TBSP of balsamic vinegar and 1 TBSP of extra virgen olive oil for flavor.  This is important to do at the end of your simmer as high heat destroys the flavor of olive oil.  The result was beautiful, rich, deep, sweet, and spicy all at once. 

Monday, August 2, 2010

Getting Creative With My CSA, The Eggplant Diaries

I rarely buy eggplants.  I just don't know what to do with them half the time.  The other half of the time I panic over the amount of oil they absorb when sauteeing.  My CSA crate has brought me several eggplants and forced me to move my repetoire beyond the traditional greek dishes like moussaka.  I love moussaka.  I made one last week that was absolutely amazing, but took about 3 hours of prep.  I stared at my latest eggplant in dismay.  I didn't want to spend 3 hours making it delicious.  And I didn't have to because I have finally learned the secret of Middle Eastern grandmas.  The secret of perfectly smoky non-bitter eggplant puree to form the building blocks of delicious spreads to dip toasted pita and sliced cucumbers into... from kashk bademjan to Baba Ghanoush


This recipe yields a wonderfully smoky, tangy, and rich baba ghanoush.  Its actually better than any other baba ghanoush I've ever tasted.  Start with a medium to large eggplant.  Now here's the secret of grandmothers all over Greece and the Middle East.  Char the skin on all sides over medium to high flame on a gas burner so the skin turns black and crispy.  Keep rotating the eggplant every minute or so to get all parts as best as possible.  Then wrap loosly in tin foil and bake at 350 F for 30 minutes and let cool.  After it cools, the skin should come off easily, just peel it off and set aside.  No oil required.  No messy pans and gross amounts of oil.

Dump the eggplant pulp and the juices in the tin foil into a blender.  The rest is ridiculously easy.  Add 1/4 cup lemon juice, 1/4 cup tahini, 4-5 cloves of garlic roughly chopped, and salt and pepper.  Blend until smooth.  Then stir in about 2 TBSP olive oil.  Refridgerate at least 3 hours (preferably overnight) to let the flavors come together.  I ate mine with an extra drizzle of olive oil atop sliced cucumbers from my CSA crate, which adds a bright fresh note to smoky flavor of the eggplant.

Sunday, August 1, 2010

A Taste Of Germany

Sometimes I eat things just to make people jealous.  I generally aim for making the masses jealous.  This time, I was able to appease Boy's love of all things hotdog and target my jealousy campaign at one friend in particular, who I will call Jealous Dude to protect his identity.   I've been making a ridiculously large number of batches of sauerkraut due to cabbage showing up in my CSA crate repeatedly.  Jealous Dude has repeatedly threatened me with needing a saukerkraut tasting due to his unhealthy obsession with sauerkraut.  Claims that he will bring the brats have not come to fruition and so, after a long day of kayaking, mini-golfing, salsa dancing, and parkour training, I decided it was time for my tribute to Germany.

I went to Balducci's on a whim.  Mostly because it was on the way home from the park and because I knew it was supposed to be a fancy grocery store.  Fancier and more outrageously expensive than Whole Foods.  But I knew that I needed to find a brat and buns worthy of my homemade sauerkraut.  Balducci's did not fail me. 


We chose Binkert's Bauernwurst on the recommendation of the meat counter guy, a beef and pork mixed brat which incorporates mustard into the seasoning mix.  The whole wheat buns were hearty and looked like they could stand up to the brats.  A dollop of spicy brown mustard and some grilled sweet corn from my CSA crate rounded out the meal and my plans for delicious, amazing, perfectly balanced German amazingness was complete. 

Wednesday, July 28, 2010

Comfort Food

I've been doing flying trapeze as a way to balance martial arts, salsa, and biking since those seem to fatigue my legs a lot.  Except that some of the harder tricks I've started to learn are taking a toll on my body and after doing a killer trapeze-martial arts-salsa-biking-trapeze triple header, my body felt like it was about to fall apart.  All I wanted to do after my last trapeze class was hunker down with a hot plate of comfort food and start reading Anthony Bourdain's new book Medium Raw

My fridge was nearly empty as my CSA pickup day is Wednesday and well, it was a Tuesday night.  I briefly contemplated running out to Whole Paycheck for something easy.  A big bunch of beautiful collard greens rediscovered in my veggie drawer, garlic from last week's CSA basket, along with some red chili peppers from my garden inspired Linguine with Spicy Collard Greens and Bacon.  This dish is a rich hearty dish, something that would be more appropriate for a crisp fall day. For me, it was perfect because the air conditioning is on full blast in my apartment keeping it at a cool 68 degrees while my latest batch of home brew ferments (mmmm, London Porter on the way!). Sometimes, its the simple dishes that are the best. For me, simple dishes that allow me to incorporate all of my CSA or farm stand or Farmer's Market goodies are the best. This dish, aside from the linguine, is 100% local and organic.


I browned in my cast iron skillet 1 thick slice of homemade bacon sliced into lardons (google it... I had no idea what the heck a lardon was until I started making my own bacon), 1 thinly sliced shallot, 4 cloves of garlic minced, and 4 red chili peppers minced.  Then I added a bunch of sliced collard greens with the thick stems removed and wilted them down.  Then I added about 8-10 pieces of dried farm stand tomatos and let them slightly rehydrate.  Season with a tiny bit of salt and liberal amounts of pepper.  Add linguine cooked al dente -- I used about 1/3 box of linguine -- and add a drizzle of olive oil and toss while still on medium heat.

The dish was good, not great, because there were 3 things missing from this dish.  While the dried tomatos provided the perfect amount of sweetness and the peppers provided just the right amount of kick to offset the wonderfully bitter collard greens and the fatty bacon, it needed: (1) a tiny bit of acid, maybe a dash of cider vinegar or white wine; (2) toasted pine nuts or walnuts to add some texture; and (3) a little shaving of parmesan instead of the salt to add some depth.  Of course, I knew all of this when I made the dish.  I was just determined not to have to go to the grocery store... sometimes you have to know when to rest and not let the food control you.  Ha.

Wednesday, July 21, 2010

Garnishes for Summer BBQs

Growing up, my family had a strange tradition of serving sauerkraut at holiday meals.  I'm not sure exactly where it came from, but my mother has always loved sauerkraut.  Its funny, we never ate it as most people do, piled onto a fat juicy brat.  No, it was served in a bowl by itself as a garnish to turkey, stuffing, cranberries, or to eat on its own.  An excess of cabbage in my CSA has led to a series of sauerkraut experiments, due in part by a hankering for brats and threats from a friend of mine who loves sauerkraut.  My friend's mom makes the best venison brats which she traded me for home brew and grassfed beef and they are so good that I am itching to experiment with making my own.  Methinks that homemade Sauerkraut might be the perfect excuse to buy a meat grinder and some casings as my next food project next week, when my first batch will be ready.  [Admission: I had one failed attempt due to the salt water brine not covering my cabbage all the way which I had to throw out]


The most basic sauerkraut is a simple affair, shredded cabbage, kosher salt, filtered water, and bacteria which is already present in the air and on the cabbage leaves.  The salt draws out the water and kills off the spoilage bacteria.  Most recipes I saw called for 3/4 to 2 tsp of kosher salt per pound of prepared cabbage, which I sort of eyeballed and probably ended up using a little more than 2 tsp.

Toss one head of cabbage, shredded, and salt together in a clean bowl to release the juices.  Let it rest 10-15 minutes and then toss again.  Then stuff the cabbage into a sterilized mason jar (you can do this by either boiling the jar and lid for several minutes in water or cheat like me and use the sanitizer I use for beer making).  Then cover the cabbage with a salt water brine, about 1 tsp kosher salt per cup of water.  Cap loosely with a canning lid.  Then let it sit between 65°F and 72°F for 2-3 weeks.  I keep my apartment at 68°F for beer fermentation so it was a lucky coincidence.

The fermentation process producing bubbling as well as air bubbles, so I repacked the cabbage down to force out the air bubbles every couple of days.  I also skimmed off white spots and film from the top (all of which are harmless and expected).  Once the 2-3 weeks are up, transfer to the fridge and start eating!

The mason jar on the left is the basic recipe.  The mason jar on the right has 1 tsp mustard seeds and 1 tsp caraway seeds added.  It looks and smells like saukerkraut.  Once again, I've managed to make something that requires lots of patience that I don't have!

Monday, July 12, 2010

Why Arms Full of Scratches Makes Me Happy

My arms look like they went through a battle with a thorny bush.  And that's exactly what they did when we went purple raspberry picking.  All 5 pounds of purple raspberries were worth the war wounds.  I have never been a huge jam fan.  Generally, I don't eat a lot of toast for the sake of toast.  I make a pretty damn fine english muffin from scratch, which I prefer toasted and topped with an egg overeasy, a thick slice of tomato from my CSA, some Dragon's Breath cheese from Keswick Creamery which I buy at the Dupont Circle farmers market, and a big squirt of spicy brown mustard. 

After some thought and an assessment of the huge load of berries I had, I decided to make a small batch of Purple Raspberry Freezer Jam, which doesn't require you to cook the berries and uses a special freezer pectin made by the king of canning, Ball.  I love this jam.  I now have an existential crisis every morning trying to decide if I want to slather jam on my english muffin or fry up an egg.  I usually compromise by doing an open face egg sandwich and putting gobs of jam on the other half.  I also discovered that this jam is very tasty mixed into greek yogurt, and I bet its also magical slathered on top of a cheesecake.


I had to order this pectin online because I don't own a car and neither of my two local groceries stock it.  It runs about $2-$3 and one packet is enough for 4 cups of mashed fruit.  I love this recipe because its so easy.  Mash up enough fruit to turn into 4 cups.  Add sugar to your desired sweetness.  I only added about 1/2 cup because the berries were at peak ripeness.  Add the packet of freezer pectin.  Stir for 3 minutes as it thickens.  Spoon into small airtight containers, tupperwares, glass, whatever, let sit for 30 minutes and then pop in the freezer.  These stay good for at least a year. 

The beauty of this jam is that the fruit maintains its wonderful fresh flavor.  Traditional jams are often cooked, and packed into jars need to be processed in boiling water, which changes the flavor of the jam.  Raspberries, any kind, are best used raw and still warm from the sun from the raspberry field.  And that is exactly what this jam captures. 

Wednesday, July 7, 2010

Finally Perfecting the Elusive Flaky Pie Crust

The beginning of July marks the most oppressive hot and sticky part of the year in the DC metropolitan area.  Most people hole up in their air-conditioned houses or head out to the beach or to Harpers Ferry for tubing.  Me?  I went out during the hottest part of the day to pick berries at Larriland Farms about 40 miles outside DC in Maryland.  I love "pick your own" berry farms, mostly because you can eat as much fruit as you want and pick a ton of berries for a fraction of expensive store prices.  A few tips when you head out:
  1. Always check the farm's website or call before you go to see what is available.
  2. Ask the staff members when you arrive what is good picking.  For example, we started off to the black raspberry patch only to find very scattered picking.  So after picking about half a pint, we asked which raspberries were the least picked over and we were sent off to the purple raspberry field.
  3. We were told by the cashier at the purple raspberry field to pick low and inside the bush for best yields.  And low and behold, so long as you didn't care about getting a few scratches, it was the motherload. 
  4. Laugh quietly at the obvious newbies trying to cherry pick and who refused to get down on the ground and really dig in.  Their reward for not wanting to get dirty was  five or six berries rolling around in their pails and obvious looks of disappointment.
Anyway, I ended up picking more than FIVE POUNDS of purple raspberries for FIFTEEN BUCKS!  I have several short rants.  Chain grocery stores will never carry purple raspberries.  I don't think I've ever seen Whole Foods carry purple raspberries.  All you see are blackberries and red raspberries, and while they might be organic, they are rarely local and never have that taste of sunshine you get from a fresh picked berry.  The fact of the matter is that berries are fragile.  They don't travel well.  They don't stand up to heat.  You will never get anything as pretty as a fresh picked berry in the grocery store.  In addition to that, berry picking is a fairly time consuming process.  A tiny half pint container costs $4.  Do the math. 

Okay, this weekend got a little excessive...some produce from farmers stands also happened to accidentally fall into the car.  My favorite farm stand is on Lee Highway out near Warrenton, VA just down the street from the Wegman's... they always have a great variety and the owner is always ready with samples.  He also chills samples of his melons and has a very nice Latino guy on hand to serve you whatever you'd like to try.


So what do you do with all this fruit other than make preserves, can in a simple syrup, freeze or dry them?  I make a nearly perfect Pecan Peach Galette to take to the 4th of July BBQ at Boy's friend's house.  This recipe is adapted from an Alice Waters recipe, and not nearly as pretty.  A galette is basically a fancy way of saying that its a free form pie that doesn't require a pie tin.  I like to think of my lack of fancy crimping on the edges as rustic.


I have always been scared of doing my own pie crusts.  Mostly because I was used to mediocre pie crusts and who wants a mediocre pie crust?  I had never really tasted epically delicious pie crusts before.  My mom made her own crusts, and they were okay, but not epically delicious.  I ended up preferring crushed nut pie crusts, or graham cracker pie crusts to the standard pastry over the years.  But I was determined to at least give it a go, the right way.  And guess what?  When you add lots of butter, keep the pastry at the right temperature, and don't overmix, you get a perfect flaky buttery epically delicious pie crust!

The hardest part about making crust is keeping everything cold and avoid overworking the dough.  Basically, you don't want the butter to melt and you don't want to develop the gluten in the flour.  I mixed about 1 cup of all purpose flour, 1/2 tsp sugar, and 1/8 tsp salt in a tupperware container, shook it up, then stuck it in the freezer.  In a separate tupperware, I stuck 6 TBSP butter cut into 1/2 inch pieces, and then put that into the freezer for about 30 minutes.

Then I plopped it all into a shallow bowl, tossed lightly, and then cut the butter as finely as I could, covering all the tiny butter bits with flour.  I know I could have used a blender for this job, but I was exhausted from having climbed a mountain earlier and I was at Boy's house, and didn't know where the blender was.  He was blissfully sleeping and so I figured I could do it old school with two sharp knives.  It was supposed to resemble coarse cornmeal, but mine was decidedly lumpier for lack of patience.  I stuck the shallow bowl back in the freezer while I made some ice water.  Then I slowly dribbled about 4 TBSP ice cold water into the dough and used a spatula to pull it all together.  I ended up having to use extra water, and then figured out that I had added just a bit too much.
 
So I patted it into a disc, stuck it in the fridge, and made sure that I over floured my surface to account for the extra water.  After about 30 minutes, I took the dough out, threw some extra flour on top, and then rolled it out to about 1/8" thick.  I then rolled the dough up on my rolling pin, and laid it out on a cookie sheet lined with parchment paper and stuck it back in the fridge for 30 minutes. 
 
Onto preparing your oven... rack placement was a bit of an issue for me.  I was told putting the galette in the bottom third of the oven would yield the best result, but I ended up kinda freaking out because the bottom seemed to be cooking too fast, so I ended up having to move my galette to the top rack and then finish it off with the broiler.  When I do this again, I might do the same thing, have one low and one high rack and then switch the galette in the middle.  Because the bottom should cook well and quickly in the beginning to avoid the icky squishy pie crust bottom.  Long story short, have a low rack and a high rack and then preheat your oven to 400.
 
Pie assembly is the easiest part.  The secret to non-soggy crust is to have some sort of delicious absorptive matter between the crust and the fruit to act as a buffer while the crust cooks.  This time, I used about 1/2 cup finely chopped pecans mixed with 1 TBSP sugar, and 2 TBSP flour with about 1/2 tsp cinnamon and 1/4 tsp ground nutmeg.  Then I layered sliced peaches from the farm stand, topped with another sprinkling of sugar and some chopped nuts, and then carefully pulled the crust sides up over the fruit.  You just need to get enough of the crust over the fruit so it will keep it shape.  Now, a pretty Alice Waters galette would probably be beautifully crimped with uneven edges pinched off.  I am not Alice Waters.  I like rustic homestyle baking and think that crimping off uneven edges wastes perfectly good crust.  To finish it off before baking, brush some melted butter and sprinkle additional sugar on the crust.


Bake for about 45 - 50 minutes.  Keep an eye on it.  My peach juice kinda exploded all over and drooled down, so I ended up mopping it up so it wouldn't burn on the pan.  Remove immediately from pan onto a rack to cool.  This was so pretty and Boy and I were so tired, that we contemplated skipping the 4th of July BBQ and just eating the galette at his place with a couple of beers.  We exercised an extraordinary amount of restraint, but then demolished half the thing at the BBQ. 

Tuesday, June 29, 2010

Date Night With Myself

After biking 185 miles along the C&O canal towpath with camping gear strapped to my bike, a couple good friends, and a slightly bunk knee, I decided I needed a date night with me, my kitchen, and a good movie.  I was still starving from the aftermath of burning 2000 - 3000 calories a day on top of whatever my body burns naturally, but since I had been gone for almost 4 days, my fridge was pretty empty with the exception of the half dozen or so different pickles in various stages of fermentation.  I had already frozen/dehydrated/pickled most of my CSA items.  Hrm.  What I did have were some freshly dug baby red potatoes, a red onion from my CSA, some eggs, and some leftover milk that had not gone bad yet.  Although this screamed breakfast, it did not bode well for my date night with myself.  That is, until I remembered a potato tart that I had drooled over from Smitten Kitchen's blog.  I guess I can't call whatever it is I made a tart because I didn't use a tart crust... so I'll call it my Blue-Brie Potato Custard.


And so I headed off to Whole Foods to grab some blue cheese and a bottle of a light bodied pinot noir with a cherry finish.  The most important thing is to open the bottle of pinot noir and pour a glass.  Then take a couple sips before beginning this dish.

This dish is easy comfort food...  potatoes au gratin dialed up a couple notches into "fancy" food.  In fact, its easy enough that you can drink a glass of wine or two while you make it and it will still be delicious and nearly idiot proof.

I took about 4 baby red potatoes, cut them in half and then sliced about 1/8" thin.  These were laid out in an overlapping circular pattern and fanned out in a jumbo muffin tin sprayed with olive oil.  Then whisk together about 3/4 cup milk or cream with 1 or 2 egg yolks.  I used 2 yolks for additional richness as the milk I had was only 2%.  Add a pinch of salt, cracked pepper, a pinch of thyme and basil, and pour over the potatoes until they are almost covered.  Then top with little chunks of blue-brie (basically a very soft blue cheese), walnuts, and slivered red onion.  Bake at 350 for 45 minutes until the potatoes are done.  Let cool before serving. 

Wednesday, June 16, 2010

Oh Bacon, How I Love Thee!

One of the joys of the Farmers Market is that I get to actually talk to the farmers.  Many of them find me amusing because I get so excited about food... about their food.  The guy from Cedarbrook Organic Farm near Harper's Ferry, West Virginia who has a stand at the Dupont Farmers Market is one of my favorite.  Although he has a diversified organic farm, he specializes in raising organic free range pigs which he sells at the Farmers Market.  He also gets just about as excited about his meat as I do.  He always asks me what my plans are for each cut of meat I buy.  So when I told him I've always wanted to make my own bacon, he not-so-casually mentioned that he also sold pork belly.  While I managed to resist the temptation that week, I knew I was simply postponing the inevitable... it took me just one more week to break down and buy a 3.5 slab of pork belly.  This is not a big surprise because anyone who has spent any sort of time with me knows that I love bacon. 

And so, I made my venture into Hickory Smoked Maple Bacon, and it was a delicious success despite a few missteps along the way.  The limp thin slices which line store bought packages pale in the shadow of this thick cut slab bacon.  To be perfectly honest, this even beats the fancy bacon Whole Foods stocks at their meat counter.  The hardest part, smoking the bacon, is time consuming but well worth the effort when doing a large batch.  I have enough bacon to last me and Boy at least four to six months for minutes a day during the curing process and one three hour stint to smoke the thing. 


There are basically two main steps in making bacon:  (1) cure the pork belly in some combination of salt and flavorings and (2) smoke the pork belly. 

Curing is remarkably easy.  I used about 1/4 cup of kosher salt, 1/4 cup of brown sugar, and 1/4 cup of maple syrup for my cure.   I rubbed this all over a 3 pound piece of pork belly (skin on) and then stashed the pork belly in a big tupperware container.   I actually had cut off about 1/2 pound of the little end of the belly to cure with just salt to make lardons.   I didn't know it was called lardons until this bacon making journey, but these are little strips of bacon browned to add flavor to other savory dishes.  I figured the maple would not necessarily taste great say, in a pasta dish.  Over the next 5 to 7 days, the meat cures in the fridge.  I flipped the meat over about once a day or once every other day, dumping out the fluid which the salt has drawn out and sprinkling a pinch of salt if a lot of fluid had been removed.  Each day, the meat gets firmer and firmer as the salt draws out the moisture.

Once the belly is cured, rinse the belly really well under cold water.  In order to avoid super salty bacon, I actually soaked mine in cold water for about 20 minutes and then patted dry.   The big question was how to smoke this thing in my urban apartment, which is actually a basement apartment in a 3 unit townhouse.  I'm lucky enough at least have a yard and a stoop to work with.  Now, you can bake this for 3 hours at 200 degrees in an oven to finish off the pork (or until the internal temperature is 150 degrees), but you won't get the lovely flavor that smoking imparts.  And while I had dreams of rigging up Alton Brown's homemade smoker, it proved to be cheaper and easier to buy a cheap $30 grill.  My initial rigging was to pile the charcoal on one side and put dry hickory chips in tin foil and puncture holes in the top to let the smoke come through.  The bacon should be laid skin side down on the side where there is no coals so it gets indirect heat from the smoke.  Unfortunately, the tin foil method did not work so well.  Mostly because my charcoal wasn't lit properly and didn't produce enough heat to make the wood smoke.


And so I ended up just dumping a mixture of hickory chips I had soaked in water and dry hickory chips directly on the charcoal and my bacon was enveloped in a beautiful cloud of smoke.  I covered the grill keeping the bottom vents open, and the top vents half open and turned to the opposite side of the grill the coals were so the smoke would draw up over the belly.  The tiny little snafoo was that since I had woken up at 5 am to smoke this away from the heat of the day, I was tired and my coals hadn't burned off all the lighter fluid yet, so I had a few minutes of lighter fluid smoke mixed in with the hickory smoke. Oops.  I stuck a thermometer inside the lid through the top vent to ensure it stayed at a happy 180 - 200 degrees.  The hardest part of this step is that you need to monitor your chips, coal, and temperature for about 3 hours.  Next time, I'll do it with a friend and a couple beers.


Once the bacon is done, stick it in the fridge so it can cool down and its easier to slice.  Next time I might actually stick it in the freezer for about 30 minutes after it is cool because I still had some difficulties cutting the bacon.  Cut the skin off as close to the skin as possible to keep all the luscious fat on the slab. Not that it was really bad, I ended up with some really thick bacon, but it would have been nice to keep the slices just a tiny bit thinner.  All said and done, the lighter fluid taste is barely noticeable given the magicness of the bacon itself.  Next time I'll take better care to make sure I wait for my coal to be perfectly ready. 

I presliced my entire slab and sealed each thick piece separately in some press n' seal, and then rolled the whole bit up for easy storage.  That way I can just cut one piece out at a time as I use it without having to expose the other pieces.

Tuesday, June 15, 2010

Farm Stand Addiction

I cannot pass up farm stands.  This is a plain fact that Boy has readily accepted and in fact, has become similarly obsessed.  Some of the first tomatoes of summer are here already from seedlings nutured in greenhouses to allow for earlier production, and finished outside in the warm sun of early summer.  We stopped by a small but friendly farm stand on the way back from skydiving this past weekend and were greeted with a latino guy enthusiastically stuffing samples into our hands, from cantaloupe to tomatoes to cherries.  The tomatoes were perfectly ripe with that deep rich red color all the way through the tomato and were so juicy and delicious, you could eat them like an apple.  Tomatoes like these are impossible to find at the grocery store, where the pale pink mush they pretend to call tomatoes prevail.  Even the redder so-called vine ripened tomatoes will never rival the farm stand tomato.  So of course, I ended up buying 6.5 pounds of tomatoes (along with 2 quarts of beans and 3 pints of cherries).   

I know Sun-Dried Tomatoes are "so 1990s", but I love them, I don't care what anyone else says.  I have dreams of pastas tossed with sun-dried tomatoes, crispy homemade bacon, and spring greens / spring peas / spring anything.  I cut these into 1/4" slices, and then in half down the middle since the tomatoes were huuuuuge.  It took about 18 hours to dry because these guys were so damn juicy. 


I took some of the tomatoes and packed them with sliced garlic into a small mason jar with oregano, basil, and olive oil.  The rest I left as-is, for snacking and other yet-to-be-determined plans. 

Monday, June 14, 2010

Pickle and Preserve Invasion... Discovery Ways To Bake Away Veggies

After peering into my refrigerator and seeing piles of spicy garlic asparagus pickles, pickled broccoli and garlic scapes, key lime preserves, ginger radish pickles, mango rum jam, garlic snow pea pickles, and sweet watermelon rind pickles... I knew something had to give.  I don't like to do large batches of pickles, mostly because I love to experiment with flavors.  The amounts of random veggies I get in my CSA also lend themselves to single batches and help me work through a full CSA share.

Although I had initially thought of processing large batches, but I decided against doing that until I have a tried and true recipe.  For example, next year when asparagus is in season, I am going to hunt down a farmer's stand on the Eastern Shore and buy 20 pounds of asparagus (its $2 a pound at the stand, half the price of the Farmers Market and Whole Foods even when it is in season) and do a huge batch of pickled asparagus.  Because I learned this year that pickled asparagus is simply amazing.  And I only have 2 jars left.  Sniffle.  And I'm a cheapskate so I refuse to pay full price at the grocery store. 

Anyway, all my small batches of refrigerator pickles are starting to pile up, and even though I love pickles nearly to a fault, and even though I have a big refrigerator, this is getting ridiculous (oh, and I have grand plans of pickling beets this week, too, so well, *sigh*).


My freezer, on the other hand, is pretty empty.  I don't buy frozen meals, or meat in bulk (although I loved my grass-fed beef share, it was too big and too much and I don't eat it enough... I ended up gifting a lot of it away), or frozen veggies or frozen fruit (that happens in the winter occassionally, although this year I plan to freeze my own).  What goes in the freezer are my homemade items such as chicken stock, leftovers, sofrito, the occassional Farmers Market meat purchase that is waiting for just the right moment (and which came to me frozen... like my massive pork ribs). 

My CSA share is growing week-by-week, and while the first couple of weeks were manageable, even without much help from Boy, the veggie takeover in my fridge is going a little nuts as my garden starts contributing to the veggie jungle.  I woefully looked at big heads of broccoli, 2 big zucchinis, and 2 big yellow zucchinis, along with the massive amount of greens and other veggies.  My first thought was to pickle them, but well, yea.  My second thought was zucchini bread.  Except I am trying to stay away from making too many sweet baked goods (aka the "Extra Pound Lesson Learned From Rhubarb Weeks"). 

After some research, I settled on a redesigned version of Savory Zucchini Muffins that to rid myself of two of my zucchinis.  They aren't pretty, but are a delicious change from the typical zucchini-pretending-to-be-pumpkin-bread type of recipe.  These have a nice kick and the savory flavors blend together perfectly.  The muffin itself is moist and satisfying. 

Saute 3 cloves minced garlic and 1/4 cup chopped oil packed sun-dried tomatoes in about 1 TBSP of the olive oil the sun-dried tomatoes were packed in.  Then dump that into a bowl with with 2 medium zucchinis shredded (I just used a cheese grater, but if you have a food processor, that will go much faster), and 1/3 cup chopped roasted red pepper.  Then I incorporated 1/2 cup softened butter, 1/2 cup greek yogurt, 2 TBSP sugar, 2 eggs, 1 TBSP olive oil, 1/2 tsp hot sauce (I used some Killin' Me Man Sauce I brought back from Panama) and 1/2 cup milk together, and then dumped into the veggie mix and mixed again.  In a separate bowl, I mixed together 1 3/4 cups all-purpose flour, 1/4 cup cornmeal, 1/2 cup whole wheat flour, 2 tsp baking powder, 1 tsp baking soda 1/2 tsp salt, 1/2 tsp freshly cracked black pepper, 1 tsp dried basil, and 1 tsp dried oregano.  Integrate the wet stuff with the dry stuff, slop into a greased muffin tin, sprinkle some grated parmesan on top of each muffin and bake at 375 for 35 minutes. 

Wednesday, June 9, 2010

Food for Everyday

I found myself with a random night to myself when plans with Boy fell through at the last minute and I had already started too many projects which made it seem worth it to stay in.  Sometimes its not about making fancy food, but rather to stock up on the basics.  Its important to keep the quick stuff around for when you don't have time to cook but want something good and homemade.  In particular, I need to have easy breakfast food on hand because sometimes, fruit just doesn't cut it.

I made a rare visit to the grocery store to stock up on fruit (its too early in my CSA for me to get enough fruit to last me a week since I eat a ton of fruit) and goods for a few projects.  Mangos were on sale.  Not just any mangos, but Ataulfo (aka Champagne) mangos which have a lovely creamy texture.  I fell in love with these mangos when I lived in Mexico.  And just like those mangos, these ones were also from Mexico and not organic, but cases of mangos were on sale for $10.  That meant about 20 mangos for $10... the frugal side of me won in the contest of "local and organic" versus "but its 50 cents a mango!" 

I decided to dry a large chunk of the mangos, turn some of them into creamy mango swirl popsicles, and the rest were turned into a tangy Mango Rum Preserves.  Since I don't like to mass produce jams and pickles until a recipe is tried and true, I did a test batch.  Since mango is so thick to begin with, it doesn't really need the fruit pectin for it to set properly.  I basically cooked the following ingredients together on low for about 20-30 minutes until it formed a nice thick consistency and it was almost starting to brown on the pan.
  • 1 1/2 cups diced mango
  • 1/4 cup water
  • 2 TBSP rum
  • 1/4 cup sugar
  • Juice of half a lemon
Next time I'll make sure my mango is completely ripe.  I got impatient and used some slightly underripe mangos.  This is still a lovely tangy and chunky jam not too sweet and is wonderful spread on homemade english muffins (which I keep on hand at all times).


Another staple of mine is Granola.  The beauty of granola is that it can be sprinkled on top of just about anything, fruit, yogurt, ice cream... or eaten plain.  I melted 2 TBSP real maple syrup, 2 TBSP raw honey, 1/4 cup canola oil, 1 tsp cinnamon, a dash of vanilla extract, and 1/4 tsp salt together.  Then I poured this over a mixture of 3/4 cups of raw walnuts, 1/2 cup wheat bran, and 4 cups rolled oats.  Bake at 325 for 20 minutes, stirring once or twice until crunchy.  Then once its cool, add whatever dried fruit you have on hand.  I had some dried plums from my Lawyers Have a Heart 10K race packet, so I just threw those in.


Since I am in the process of curing my own bacon, I decided I needed to use the last of my fancy bacon in the freezer.  This decision coupled with the guilt of not having any breakfast items on hand for Boy the last time he was here spawned the rebirth of my mini-quiches.  That is, a crustless quiche made in muffin tins for perfect breakfast portioning, which can be easily frozen and reheated.  This time, I did a Bacon Radish Green Quiche, a marriage of leftover fancy bacon and some of the greens in my last CSA basket I am trying to work my way through.  This recipe is so flexible it doesn't really warrant a recipe per se.  Its basically eggs whisked vigorously with some dry nonfat milk, mild cheddar, radish greens, cooked bacon, salt and pepper with shaved parmesan on top... then baked at 350 until the quiches rise and the cheese gets crunchy on top.  I usually wrap these in plastic wrap and then store them in a freezer bag to avoid freezer burn.  They reheat really fast in the toaster oven in the morning, which I usually do on a small piece of tin foil at the same time as I toast my english muffin.